Scandinavian Brunch
1/7/2023 | 26m 45sVideo has Closed Captions
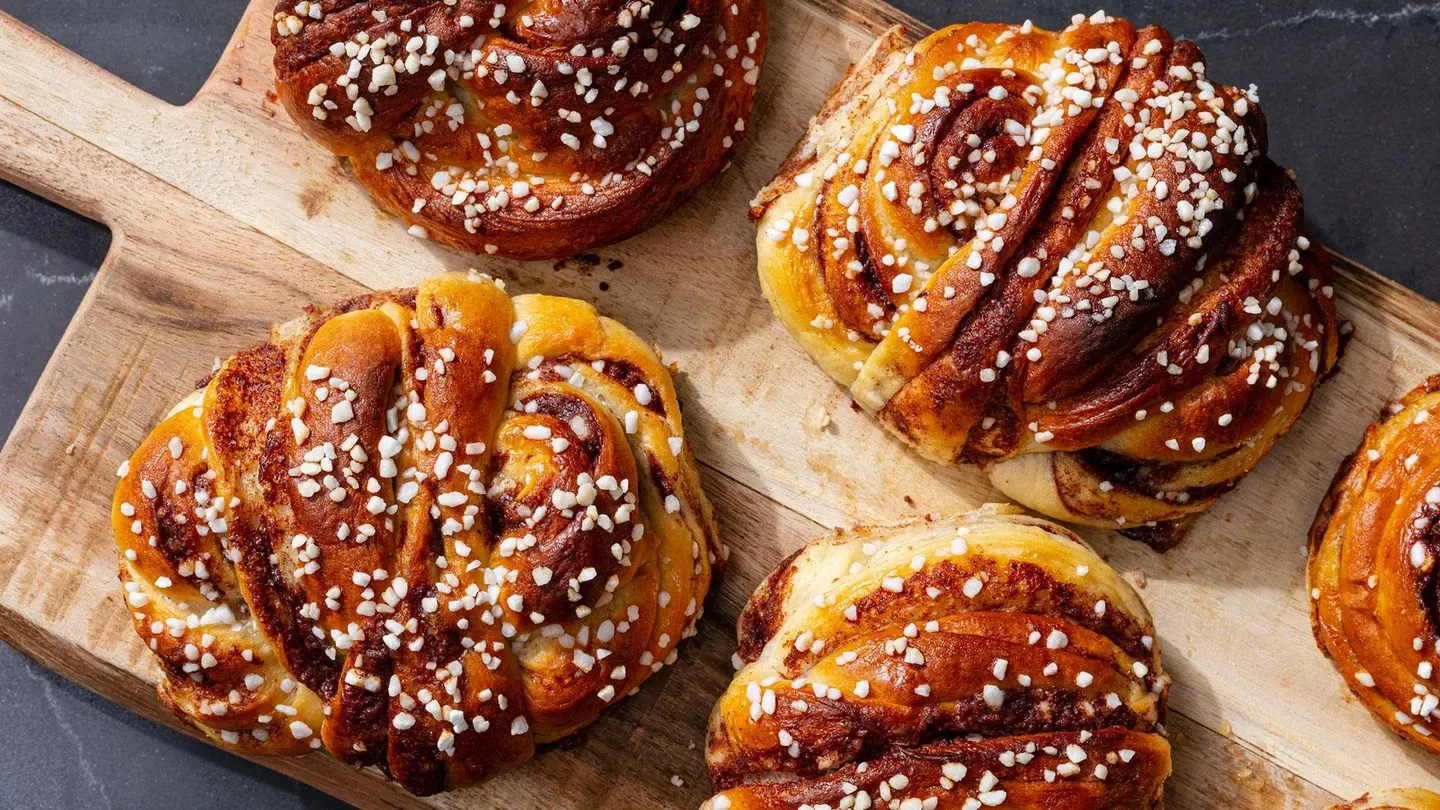
Spiced Kanelbullar (Swedish Cinnamon Buns), gravlax and robot vacuum reviews.
Hosts Bridget Lancaster and Julia Collin Davison bake perfectly spiced Kanelbullar (Swedish Cinnamon Buns). Gadget critic Lisa McManus reviews robot vacuums. Julia shows Bridget how to make Gravlax.'
Problems with Closed Captions? Closed Captioning Feedback
Problems with Closed Captions? Closed Captioning Feedback
America's Test Kitchen is presented by your local public television station.
Distributed nationally by American Public Television
Scandinavian Brunch
1/7/2023 | 26m 45sVideo has Closed Captions
Hosts Bridget Lancaster and Julia Collin Davison bake perfectly spiced Kanelbullar (Swedish Cinnamon Buns). Gadget critic Lisa McManus reviews robot vacuums. Julia shows Bridget how to make Gravlax.'
Problems with Closed Captions? Closed Captioning Feedback
How to Watch America's Test Kitchen
America's Test Kitchen is available to stream on pbs.org and the free PBS App, available on iPhone, Apple TV, Android TV, Android smartphones, Amazon Fire TV, Amazon Fire Tablet, Roku, Samsung Smart TV, and Vizio.
Providing Support for PBS.org
Learn Moreabout PBS online sponsorship♪♪ ♪♪ ♪♪ ♪♪ -Today on "America's Test Kitchen," Bridget and Julia make kanelbullar.
Lisa reviews robot vacuums.
And Julia makes Bridget gravlax.
It's all coming up right here on "America's Test Kitchen."
"America's Test Kitchen" is brought to you by the following.
Plugrà European-style butter was created for all chefs, cooks, and bakers.
Slow-churned with 82% butterfat for a smooth texture and more pliability for flaky crusts.
Plugrà -- from professional kitchens to your home.
Sailing with American Queen Voyages brings you to mighty rivers and unique expeditions, where passionate explorers can discover the continent of North America.
You can learn more about our voyages at AQVoyages.com or contact your travel advisor.
Sur la Table, where you can discover an assortment of provisions for your next meal or gathering, from cookware and tools from a wide variety of kitchen brands to hands-on cooking classes.
Visit us at surlatable.com.
♪♪ -Kanelbullar is a type of cinnamon bun found all over Sweden, and they're usually served alongside a cup of coffee during fika.
Now, fika is a well-loved midday break where you take time to enjoy the day and the people you're with.
And today, Bridget's going to make kanelbullar for me.
-How many cinnamon buns have we made together?
-A lot.
-But I'm going to show you how kanelbullar are singularly Swedish.
-All right.
-All right?
So, cardamom is a big flavor here.
Now, you can buy cardamom seed.
They can be hard to find and really, really expensive.
It's actually best if you can find the pods and grind them yourself.
-Ooh, it smells so good when it's fresh.
-It's floral, it's grassy, it's beautiful.
Now I just need 2 teaspoons of cardamom seeds.
I'm going to take my pestle here and just crack them.
And then -- you can help me -- just open these up, and you can see these little tiny seeds.
-Just going to put them in there?
-Lovely.
Yes.
So, I'm just going to take the mortar and pestle and just kind of lightly crush these.
We need about 2 teaspoons of the seeds that are coarsely ground.
Now, our dough.
We're going to use tangzhong.
So that's basically a gel.
It's almost like a pudding made from flour and milk, and it's going to help to trap the moisture inside the dough.
I've got 3/4 cup of whole milk here and 1/4 cup of bread flour.
So that's about 1 1/3 ounces.
And I'm going to whisk this together.
And we're using bread flour here and throughout the recipe because we really need that structure, that higher gluten.
All right.
So this does not look like much at this point.
I'm going to microwave this for anywhere between 1 to 2 minutes.
I'll go in, and I want to stir it every 20 seconds.
I'm looking for it, again, to be nice and pudding-like and pretty thick.
[ Microwave beeps ] And there you go.
-Ooh!
-All right.
We're getting -- We're getting thick.
Actually, I think this is looking pretty good.
It's almost like mashed potatoes.
So let's walk on down here.
I'm going to go ahead and put this into the bowl of my standing mixer and I'm going to add 1/2 cup of whole milk.
This is really cold.
We need to cool this mixture down.
And I'll whisk this together.
All right.
So that looks good.
And now we'll add the rest of our flour.
This is 11 ounces, or 2 cups, more of the bread flour and a whole tablespoon... -Wow!
-...of instant yeast or rapid rise.
Now, we are going to add cardamom to the dough directly, and cardamom can really inhibit the growth of yeast, so we have to add extra.
So we're going to mix this on low speed until the flour is just mostly hydrated.
And that's going to take about a minute.
But that looks great, looks well-hydrated, but with the machine turned off, I'm just going to cover this with a little bit of plastic.
We want to give time for the flour to fully hydrate so it can start more gluten development.
And we do this before we add any sugar or salt because, really, they kind of compete for the attention of the water.
So we're giving the flour full attention.
Okay.
15 minutes.
Can get rid of the plastic.
The flour has been fully hydrated in there.
Now we can add our sugar and salt.
This is 1/4 cup of granulated sugar and a teaspoon of table salt.
All right.
So I'm going to turn this to medium-low until all the sugar and the salt are worked into the dough.
So, it's been about five minutes.
All the sugar, salt in the dough.
-It's a beautiful-looking dough.
-It's a gorgeous dough, but it's just not rich enough, Julia.
-[ Chuckles ] -I know you like rich things.
-Mm.
-So we're going to add butter.
This is 6 tablespoons of unsalted butter.
All in it once.
You don't need to feed it.
And that's nice and softened, so it's going to incorporate in very easily.
And at this point, we're going to add that cardamom.
-[ Sniffs ] Oh!
-Again, it was 2 teaspoons, coarsely ground.
And so when you bite into the dough later on, you're going to get these little pops of cardamom.
And it's just -- it's kind of magic.
-Mmm!
-Back on medium-low for another five minutes until it's all incorporated.
It's going to be pretty sticky.
But in any case, I'm going to go in there a couple of times and scrape everything down.
[ Inhales deeply ] Mm-hmm!
-You warned me that it was a soft dough, and you weren't kidding.
-Yeah.
No, it's definitely sticky at this point.
It would be impossible to roll it out and make cinnamon buns.
We want to get it really nice and chilled, and we want to start working it towards a rectangular shape.
So we've got here a 9x13 inch baking pan, really well-greased.
I'm going to use it kind of as a little form.
-Ah!
-I'll scrape dough right in there.
-Very clever.
-Then, here, you can go right in there.
You can start to push the dough out.
Look -- and it's almost like cookie dough, how soft it looks.
-Exactly.
Now, once it's in there, you want to flip it over because that bottom side was greased by the pan and now it's the top side.
So we're just going to keep working this in there until it's in the corners, relatively even.
Now I want to cover this with some plastic wrap.
This is going to go into the fridge, and you want to let it get really well-chilled, so about an hour in there.
Okay.
So, got our dough.
How about some filling?
-Yeah.
-We're going to use the same bowl here.
I've got 3/4 cup of granulated sugar.
And more butter.
6 more tablespoons of unsalted butter.
Again, nice and soft.
And here is the kanel -- cinnamon.
-I was wondering where it was.
-Yes, it's right here.
This is 2 tablespoons of ground kanel -- or cinnamon.
Tablespoon more of bread flour.
That's going to help us to spread this.
And, also, when we go to form the shapes of the buns, it's going to help the filling to stay inside.
-Mm.
-And a little bit of salt.
Just a good idea to even things out.
And that is 1/4 teaspoon of table salt.
All right.
Back on our machine.
This time, we're going to use the paddle instead of the dough hook.
Going to mix this on low speed, and that's going to take about a minute.
All right.
We have our well-chilled dough.
It's been about an hour.
-Oh, yeah.
-It really firms up.
Now, I want to get this out of the pan, so I'm going to go ahead and flour my bench here.
Pretty highly floured.
And then, it should come out.
-Wow.
-Completely different from that sticky mess we put into the fridge.
-Mm-hmm.
-All right.
So I do want to flour the top here, and I'm making sure that I have the short end facing me because we're going to roll this out to about 18 inches long by 10 inches wide.
-Well, now it makes sense why you let the dough rest in that rectangular cake pan because it's making this part super easy.
-Exactly.
Now, this is one of those doughs that if it starts to stick, you can always just put it on a sheet pan, put it back in the fridge for a few minutes.
All right.
Looking pretty good.
-I'll be the judge of that.
-Uh-oh.
-What are we looking for?
-18 by 10, please.
-10, yep.
Nailed it.
-All right.
So, now I want to make just a little bit of a mark on the top third of this.
I'm not cutting all the way through.
This is really just a visual.
All right.
So now here's our filling.
And doesn't that smell amazing?
-Yeah.
Yes.
Very robust.
-It looks pretty spreadable.
-Yes, it's very spreadable.
I could put this right on toast right now, but I'm going to put this on the bottom 2/3 of this dough.
And I'm going to go all the way to the ends and the sides.
And that's why I made that mark.
-Aha.
-Yes.
And I'm going to keep on spreading this out until it's nice and even, and like I said, all the way to the edges.
But it is a very thin layer.
-Mm-hmm.
-I'm not going to roll this up.
We're going to do it kind of business-letter style.
So this top third that was not coated is going to come down.
Just want to even out the sides here And then, the bottom goes right over there.
So we've got these multiple layers of cinnamon and dough.
-Mmm!
-I know.
Ahh.
-[ Laughs ] -That looks great.
Now I'm going to sprinkle this with some more flour.
And we want to get this out to a 12-inch square.
So, still a very forgiving dough.
-Yeah.
She looks pretty good.
-Not bad.
We want to cut this into 12-inch-wide strips.
So I'm just going to dock this a little bit.
Just give me an idea of what I'm looking for.
So I'm going to use my ruler... -Mm.
-...because it's just a great tool.
It's going to produce these long cuts.
You can use a bench scraper, you can use a knife to cut these little strips.
But why not use the ruler?
-Masterfully done, Bridget.
-There we go.
-I've never seen such evenly cut strips of dough ever.
-Now, again, instead of that jelly-roll shape, where we cut out rounds, we're going to make these into little bundles.
It's one of those things that makes this kanelbullar and just how it differentiates itself from other cinnamon buns.
-All right.
-So instead of stretching this out to 24 inches long, I'm just going to cut this.
Use a knife.
You can use a bench scraper.
And you want to cut this until it's almost at the end.
You want to keep that attached.
And then now we have 24 inches long.
-Ah!
Very clever.
-So I'm going to show you one.
-All right.
-You're going to help me make some.
-Sweet.
-So I'm going to anchor this first piece over three fingers here.
-Mm-hmm.
-And I'm going to wind this.
And then, as I do, I'm kind of twisting it a little bit, but I'm not stretching.
-Okay.
-All right.
Now, when I get here... -Mm-hmm.
-I want to anchor this with my thumb.
-Mm-hmm.
-So it's gone around three times.
So it's going right across.
-Oh, with the tail-tuck underneath.
-Tails have to be tucked under.
Otherwise, they'll just go crazy.
-[ Laughs ] Got a half sheet pan lined with parchment paper.
All right.
You want me to get you started with one?
-Yeah.
-You can see that that filling really stays in place from that flour.
-It does.
You can see the two lines of it.
-All right.
-If you need to dip your hands into flour, you can.
-Can't hurt.
All right, I'm going to do some spins loosely.
This is fun!
-Yes.
-One of the things about this is, the imperfection is perfection.
-My kind of cooking.
-Sweet little bundles.
-Ooh, I like it.
-That's my new nickname for you.
-[ Laughs ] -Sweet Little Bundles.
After we're done with this, I'm going to put a piece of plastic on it.
You can also put a damp towel on there.
But we want to let these sit at room temperature until they're just a little puffy.
That's going to take about an hour.
All right.
We have our lovely little puffy kanelbullar.
These were sitting out, again, for an hour.
Little bit puffed.
-Mm-hmm.
-We're just going to glaze them with some egg wash here.
This is just an egg that I've mixed with a tablespoon of water, a little pinch of salt, and lightly brush this.
Now, you're not going to use all the egg wash.
I'm being very gentle.
I don't want to deflate them.
All right.
For a final flourish, we don't just want to put sugar on here because the sugar would melt.
-Mm-hmm.
-So we're using pearl sugar.
-Non-melting sugar.
-It's a non-melting sugar.
Yeah, it's really cool.
They take the sugar and they compress it into these little orbs, and then they polish them like pearls.
About a teaspoon is going to go on each of these.
This is 1/4 cup.
If you didn't have pearl sugar, you could use demerara.
But you want something that's not going to melt very easily.
These are ready to bake, and I'm going to put them in a pretty hot oven -- 425 degrees -- but they're not going to be in there for very long.
Only about 13 minutes, maybe up to 17 minutes.
I'm going to turn the pan around halfway through baking.
And what I'm looking for is for these to get all golden brown and an internal temperature is going to register about 200 degrees.
-I can smell them from here.
-Make way.
Make way.
-Oh.
-[ Chuckles ] -It's amazing how it looked pretty rustic, but they look so refined out of the oven.
-Aren't they beautiful?
-Oh!
-Little bundles of joy.
Now you can see a little bit of the filling has leaked out.
We actually think that's kind of a feature.
It gets this really nice frilly lace.
So, they look good.
Looking for internal temperature right around 200 degrees.
Ah, it went over just by one.
That's all right.
-[ Chuckles ] I'll never tell.
-So, with a really rich dough like this, you really want to cook it enough because, otherwise, it might be kind of gummy inside.
So we're going to leave these here for five minutes right here on the sheet pan.
And then, we get them off of the pan onto the cooling rack.
We're going to let them cool for another 10 minutes, and then we can eat.
-That is a beautiful tray.
They're just so pretty all stacked up like that.
-Aren't they gorgeous?
Here.
Let me get you a beautiful one.
-Please.
-Now, what's great about this, again, is we use that tangzhong, that flour paste, so not only are these good today, but they're actually great tomorrow.
-Mmm!
-What do you think?
-Mm-mmm-mmm.
-Mm-hmm.
Yes.
-It's the cardamom.
The cardamom's everything.
It gives the buns a nuance of flavor.
And I just got a little crunchy bit.
-Isn't that great?
-Mm-hmm.
-Cardamom takes it to a whole other level because it has that citrus flavor, a little bit of that floral in there.
Oh.
-You can see how feathery the dough is.
Okay.
So I see already I'm starting to peel apart the layers.
Is that part of the fun?
-Sure.
You can fika however you want to.
-I am enjoying fika.
-You get your fika on.
-[ Laughs ] These are spectacular, Bridget.
Thank you.
-You bet.
So if you want to try your hand at this traditional Swedish treat, start by grinding your own fresh cardamom seeds, refrigerate the dough for easy rolling, and wrap the strips of dough loosely around your hand to make little packages.
From "America's Test Kitchen," a fabulous recipe for kanelbullar.
-Oh, they are good with coffee.
♪♪ -When I'm done cooking, my kitchen floor can probably tell you just what I made for dinner.
And the last thing I want to do is break out the broom or the vacuum.
Enter robot vacuums, which promise to take care of all that mess.
Now, we tested the latest robot vacuum cleaners at a wide range of prices.
They offer special features that include voice and app control, mop attachments, home mapping and scheduled cleaning, pet accident avoidance, video surveillance, and more.
Our top choices simply did the best job at removing dirt.
They were also easy to operate, using controls on the robot themselves or on their user-friendly apps.
The iRobot Roomba j7+ robot vacuum for about $800 was the champ.
It empties its own dust bin right into this vacuum bag.
Then it recharges and returns to cleaning.
This robot quickly created an accurate map that let us label rooms and set up scheduled or impromptu cleaning of either designated areas or of the whole house.
In fact, I just scheduled my robot to vacuum the kitchen every weeknight at 9:00 p.m.
The Shark ION Robot vacuum, a more budget-friendly robot at about $220, has simpler features, but it performed nearly as well in picking up dirt as our winner.
It's another great option and our best buy.
♪♪ -I love a good Swedish smorgasbord.
It's got all the meats, the cheeses, the bread, the butter, the vegetables, the pickles.
And if you've got a good one, it's got the gravlax.
-Oh, that's the best part for me.
-Yes.
-So, today, I'm going to show you how to make homemade gravlax.
And it's different from smoked salmon or lox or nova in that it's not smoked.
It's just cured.
So it has a really clean flavor and a luscious, silky texture.
-Mm-mmm!
-And it's easy to make.
You just need a handful of ingredients and three days.
-Three days?
-That's it.
-All right.
-So here we have a beautiful piece of salmon.
This is a 1-pound center-cut piece of salmon, and the skin is still on to help hold the fish together and make it easier to slice.
You can use farm-raised or wild-caught.
I kind of love the farm-raised because has a little more fat and a little more of a luscious texture.
But wild works well, too.
-It's a little more buttery.
-Mm-hmm.
Yep.
-Yes.
-All right.
Now, to start, let's start off right -- little brandy.
Now, you only want about 3 tablespoons, and we're just going to drizzle it over the salmon.
And this helps flavor, obviously.
Also helps the salt and sugar stick, so it helps the curing process.
Now for the salt and sugar.
Most recipes call for white sugar, but we found that light brown sugar just adds a little more of that flavor, that earthy, molassesy flavor... -Right.
-...which is nice.
So, this is 1/3 of a cup of packed light brown sugar, 1/4 cup of kosher salt.
If you can use kosher salt, it's ideal because you want the coverage because the grains are bigger.
-Right.
-But if you're using table salt, use half the amount.
-Gotcha.
Now I'm just mixing these together.
You want to break up any clumps.
And then we're just going to pack it on.
It's really incredibly easy.
And, you know, I've bought this stuff over the years, but once I learned how to make it, it's a game-changer.
It tastes so much better.
You want to make sure all the flesh is really covered with this salt-and-sugar mixture.
And, of course, this will melt and make a liquid and then we'll baste the fish with the liquid as it cures.
-Gotcha.
-That looks pretty good.
On top you go.
All right.
Last but not least, some dill.
The classic flavoring for gravlax.
This is fresh dill.
-Mmm.
-And it's all the little delicate leaves on top.
Just want to give it a rough chop.
This just imparts that licorice flavor that's so iconic with good gravlax.
-Absolutely.
Dill is a must when it comes to gravlax.
-Mm-hmm.
So that is a cup of freshly chopped dill.
Right.
We're going to pack the dill all on top.
All right.
Now we're going to weigh it down.
That helps make the salmon more firm and helps the curing process.
So we're going to cover the salmon with some plastic wrap, and then we're going to take another little dish.
You could use a plate.
I like using this little casserole dish because it has sides that hold in the heavy cans.
-Very nice.
-Yeah.
You want to weigh it down a little bit.
You can use bricks, you can use anything heavy you have in your house, but cans, they're always in the kitchen.
So, this has to cure in the fridge for three days.
Now, every day, we're going to go in there and just baste the salmon with any juice that comes out just to help it cure faster.
-Great.
I'll get the door.
So, let's take a look at what's happening during those three days of the curing of the salmon.
The salmon fillet is buried under a substantial amount of salt and sugar and then weighted down.
Salt and sugar both draw moisture out of the flesh, making it firmer.
We often salt or brine meat in advance of cooking it.
The salt helps to loosen the protein structure and make the meat more tender.
In this recipe, we're using a much higher concentration of salt, which causes some of the muscle protein to dissolve.
This weakens the structure of the muscle and, in conjunction with the steady pressure from the weight, it gives the fish a unique, silky, compact texture.
The high concentration of salt also inhibits the growth of microbes, so the gravlax is safe to eat for an entire week, even without cooking.
-[ Chuckles ] All right.
Here are some salmon that's been sitting in the fridge, curing for a day.
So you can see all that liquid, that's some of the juice coming out of the salmon, but that's also the sugar and salt that have dissolved.
And so now you just want to take that liquid and just really baste it back over the fish.
This just helps speed up the curing process.
And it's also fun to take a look at it.
Nothing too complicated here, just making sure it's nice and evenly moistened all over the top.
All right.
So, back under the plastic, under the weight, I'm going to reverse the weights this time so it weighs down different parts of the salmon.
-Okay.
-Back in the fridge it goes again.
Three days in total.
Every day, you baste it.
All right.
This salmon has been curing for three days, and it is ready to taste.
Let's take off the weight, take off the plastic.
And you can press on it, you feel that it's really firm.
It's very different than it was when we started out.
-Oh, it's really firm.
-It's a totally different texture.
So that's how you know it's time to eat it.
-Well, my belly says it's time to eat it.
-So we're just going to scrape off a lot of this dill, A little of it on the salmon's nice, but you really don't want to eat all of that.
All right.
So that looks pretty good.
Now I'm going to lift it out of the pan.
You want to get it dried off, so I have some paper towels here.
All right.
Just going to pat it dry nice and thoroughly.
Then it's time to slice it.
What you want is a nice, long, thin slicing knife, good and sharp.
This Granton edge, make sure it doesn't stick to the salmon as it slices through, and it's nice and flexible.
Working at a severe bias.
So want to slice nice and thin.
You can just see the knife going through it, but it's still a solid piece.
-Right.
So you don't want to have to read the newspaper through it, just want to know there's a newspaper there.
-Exactly.
-All right.
-Very good.
You don't want to fold them up too much, but I think it just looks nice on a platter.
Makes it easier to pick up if you're having a party.
Yeah.
Growing up, this was one of the standard appetizers we had at my house on this German black bread.
So I'm going to make you what I think you should have on this.
-She does this often when we dine out.
-Here's what you're having.
Here's how you'll eat it.
So this is some -- a little bit of crème fraiche.
Next, a few shallots.
And I like putting them right on top of the crème fraiche.
That way they stick.
This is a JCD special right here.
Two cucumbers and a radish.
-How preppy.
[ Both laugh ] -It is pink and green.
-I love both these things.
You get that little melon-y taste to it, and then that little bit of peppery bitterness.
Lovely.
-All right.
Now, main event here, little bit of gravlax.
I do heavy portions on the gravlax, as you can tell.
I don't skimp.
If you're having it, you're having it.
There we go.
Last but not least, a few chives.
-Lovely.
Picking up on that fresh onion flavor there.
-Yep.
-Also, I just like the color against the salmon.
I think it just looks pretty.
-Do you want to try a little crème fraiche?
-Sure.
-Just a hair.
-Mmm.
-And that... is how I serve gravlax.
-All right, I'm going to slide this down so I can get a little bite of everything.
-The texture of the gravlax is just so silky.
-Mmm.
-If you can't buy the silky, you have to make it.
-Mm-hmm.
You're right.
Completely different texture.
-Mm-hmm.
-Really buttery.
-Mm-hmm.
-Ultra silky.
-Mm-hmm.
Mmm.
-And beautifully seasoned, too.
Every bite gets better.
-Mm-hmm.
-I do love the bread with it, too.
That was super easy.
-Yeah.
-Really straightforward and so elegant.
Thank you so much.
You want to make some gravlax at home now, don't you?
Well, you need to coat the salmon with brandy, brown sugar, salt, and dill, weigh down the fish during curing, and baste once a day for three days.
From "America's Test Kitchen," silky, succulent, and simple-to-make gravlax.
You can get this great recipe and all the recipes from this season along with product reviews and select episodes.
Those are all on our website -- americastestkitchen.com/tv.
-Mm-mmm-mmm.
-Mm-mmm-mmm.
-This is a celebration.
Let us help you with dinner tonight.
Visit our website any time for the newest season's fail-proof recipes, full episodes, ingredient advice, and equipment reviews at AmericasTestKitchen.com/TV.
"The Complete America's Test Kitchen TV Show Cookbook" includes every recipe, taste test, and equipment review from all 24 years.
It's our most comprehensive cookbook.
The cost is $29.99.
That's 40% less than the cover price of $50.
To order, scan the QR code on your screen, or order online at AmericasTestKitchen.com/ Complete.
"America's Test Kitchen" is brought to you by the following.
Plugrà European-style butter was created for all chefs, cooks, and bakers.
Slow-churned with 82% butterfat for a smooth texture and more pliability for flaky crusts.
Plugrà -- from professional kitchens to your home.
Sailing with American Queen Voyages brings you to mighty rivers and unique expeditions, where passionate explorers can discover the continent of North America.
You can learn more about our voyages at AQVoyages.com or contact your travel advisor.
Sur la Table, where you can discover an assortment of provisions for your next meal or gathering, from cookware and tools from a wide variety of kitchen brands to hands-on cooking classes.
Visit us at surlatable.com.
♪♪ ♪♪ ♪♪ ♪♪ ♪♪ ♪♪


Support for PBS provided by:
America's Test Kitchen is presented by your local public television station.
Distributed nationally by American Public Television